基础架构即代码意味着编写代码来配置,管理和部署IT基础架构,这种概念以下几项关键原则:
- 可再生性:基础环境中的任意元素可以再现,复制。
- 一致性:无论何时,创建在环境各个元素的配置是完全相同的。
- 快速反馈:能够频繁、简单地进行变更。
- 可见性:所有对环境的变更都更易读、可接受版本控制的管理。
通过IaC,可以将基础设施中的元素和配置标准化、自动化,将基础设施作为软件开发流程中的一个功能,一段代码,实现基础设施的pipeline,从而最终实现CI/CD,NetOps以及DevOps。
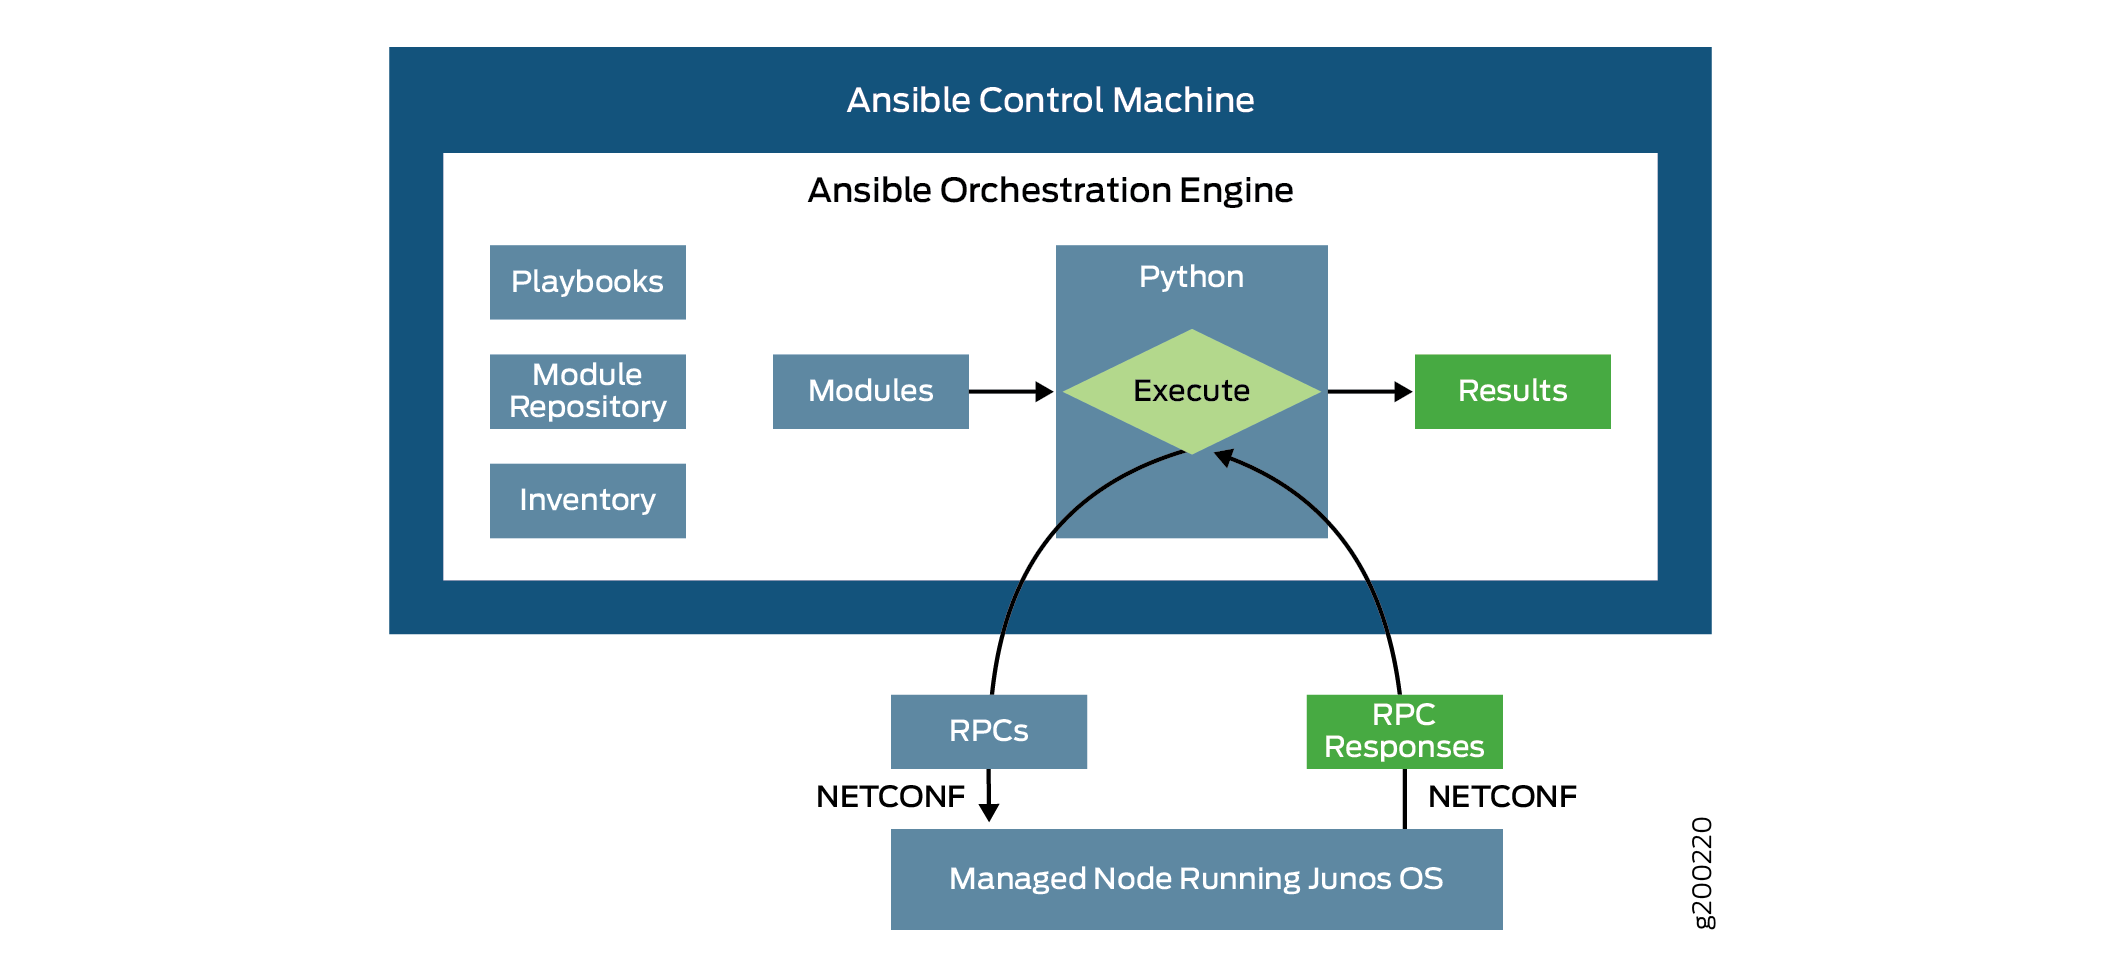
本文主要描述配置的声明以及下发示例,通过Ansible和Terraform两种IaC工具,通过Netconf over SSH协议对正在运行JunOS的网络设备进行配置的下发,后期会慢慢记录Pipeline的实现(还没弄)。
用到的协议和工具
-
Netconf
NETCONF是IETF定义的“安装,操作和删除网络设备的配置”的协议。NETCONF操作是使用XML编码在远程过程调用(RPC)层之上实现的,并且提供了一组基本操作来编辑和查询网络设备上的配置。
在NETCONF之前,CLI脚本是对网络进行自动配置更改的主要方法。CLI脚本具有一些局限性,包括缺乏事务管理,没有结构化的错误管理以及不断变化的命令结构和语法,这使得脚本脆弱且维护成本很高。这些都是因为CLI旨在供人类使用而不是用于程序访问的API的基本事实的所有副作用。
NETCONF协议旨在解决配置管理的现有实践和协议的缺点。在2002 IAB网络管理研讨会的RFC 3535概述中记录了设计阶段之前的背景工作。该工作的设计目标包括:
- 配置和状态数据之间的区别
- 多个配置数据存储(候选,运行,启动)
- 配置变更交易
- 配置测试和验证支持
- 通过过滤进行选择性数据检索
- 流和事件通知的播放
- 可扩展过程调用机制
-
Ansible
Ansible是一个简单的开源软件自动化平台,负责应用程序部署,配置管理,临时任务执行和多节点编排。Ansible本身是用Python编写的,学习曲线相当小。Ansible遵循简单的设置过程,并且不依赖于任何其他软件,服务器或客户端守护程序。它通过SSH管理节点,并且默认情况下是并行的。
-
Terraform
是一个IT基础架构自动化编排工具,可以用代码来管理维护IT资源(暂时没有支持JunOS的provider,希望官方或大佬完善,目前只在Github找到一个简单的实现,这里用作示范)。
-
PyEZ
Junos PyEZ是Python的微框架,使您可以管理和自动化运行Junos操作系统(Junos OS)的设备。 Junos PyEZ旨在在为自动化任务构建的环境中提供用户在Junos OS命令行界面(CLI)上所具有的功能。
环境准备

图片摘自Juniper.net
资源
虽然Terraform可以跨平台,但是Ansible并不支持Windows,所以我们要准备一台Linux(有Macbook就不用啦,逃。
所以我们需要准备以下资源:
- 一台非Windows系统的Controller
- 一个运行着JunOS的机器(我这边下载一个vSRX)
- 一个可以互相通信的网络
对应的IP地址:
| 组件 |
OS |
IP |
| Ansible&&Terraform控制节点 |
CentOS7 |
192.168.1.139 |
| Juniper vSRX |
FreeBSD |
192.168.1.105 |
前期配置
对于控制节点
所有的请求需要基于SSH协议,虽然Ansible支持在配置文件中声明主机密码变量以及交互式输入密码,但由于JunOS运行在BSD系统上,为了减少奇怪的问题,所以配置SSH免密登陆(生产环境也建议这样)
1
2
3
4
5
6
7
8
9
|
## 生成SSH认证密钥对
ssh-keygen
## 安装软件Ansible所需的软件,pip版本取决于Ansible使用哪个版本的Python解释器,CentOS7默认是python2
yum -y install python ansible python2-pip python3-pip
## 安装 pip模块
pip install ncclient netconf junos-eznc jxmlease
## 安装 Juniper.junos 的ansible-galaxy Role
ansible-galaxy install git+https://github.com/Juniper/ansible-junos-stdlib.git,,Juniper.junos
## terraform 安装略,二进制文件,直接放在$PATH里面就可以。
|
对于vSRX
控制节点已事先SSH密钥对。
所有的请求需要基于SSH协议,所以需要先开启SSH,以及Netconf,以及一个专用于Netconf的用户,这里临时使用root用作演示,生产环境请不要使用root,应单独声明用户Netconf的用户,且不支持密码登陆,仅允许SSH密钥登陆。
 1
 2
 3
 4
 5
 6
 7
 8
 9
10
11
12
13
14
15
16
|
## 开启SSH
## cli模式下执行
configure ## 软件配置模式
set system services ssh
set system services netconf ssh
set system services ssh root-login allow ## 生产请勿使用root
commit ## 提交
start shell ## 进入shell模式
## shell模式下执行
scp 192.168.1.139:/root/.ssh/id_rsa.pub /tmp/ ## copy公钥到本地
cli ## 进入cli模式
## cli模式下执行
configure ## 软件配置模式
set system root-authentication load-key-file /tmp/id_rsa.pub ## 免密登陆
## 非root用户请执行:set system login user ...
commit ## 提交
|
现在使用控制节点测试root登陆是否已经不需要输入密码
Ansible配置
ansible主要有两个配置文件:
ansible.cfg ,Ansible的配置文件,定义Ansible的行为。未指定的情况下,默认使用/etc/ansible/ansible.cfg- hosts,Ansible的清单文件,用来描述受管节点信息。未指定的情况下,默认使用
/etc/ansible/hosts
首先我们先修改/etc/ansible/ansible.cfg 指定刚才生成的SSH密钥:
1
2
3
|
## if set, always use this private key file for authentication, same as
## if passing --private-key to ansible or ansible-playbook
private_key_file = /root/.ssh/id_rsa
|
然后将vSRX声明到/etc/ansible/hosts这个默认的清单文件中:
1
2
3
4
5
6
7
|
[junos]
192.168.1.105
[junos:vars]
ansible_connection=netconf
ansible_network_os=junos
ansible_user=root
ansible_ssh_common_args='-o ProxyCommand="ssh -W %h:%p -q bastion01"'
|
这里我定义了一个名为junos的group,包含一台主机,主机的IP地址是192.168.1.105,同时定义了仅对junos这个group生效的变量。
Playbook
Ansible的Playbook是yaml格式的声明式文本文件,可以定义多项操作,下面几个示例可以体验一下。
banner
首先玩个玩具,也是最简单的,登陆设备的横幅:
写一个,Welcome To HIT-IDC,这时候需要一个神器,ascii Generator。输入想要变成ASCII的文字,然后粘贴到文本中,命名为/opt/junos-ansible/banner.cfg。
然后写一个简单playbook,命名为banner.yaml
 1
 2
 3
 4
 5
 6
 7
 8
 9
10
|
- name: Gather facts from Junos devices
  hosts: junos
  connection: netconf
  gather_facts: no
  tasks:
  - name: Configure banner from file
    junos_banner:
      banner:  motd
      text: "{{ lookup('file', '/opt/junos-ansible/banner.cfg') }}"
      state: present
|
我们执行这个剧本。
1
|
ansible-playbook banner.yaml
|
现在登陆设备,
 1
 2
 3
 4
 5
 6
 7
 8
 9
10
11
12
13
14
15
16
17
18
19
20
21
22
23
24
25
26
|
Last login: Fri Dec 13 17:30:53 2019 from 192.168.1.171
--- JUNOS 19.3R2.9 Kernel 64-bit  JNPR-11.0-20191120.0ebd4bf_buil


||   / |  / /
||  /  | / /  ___     //  ___      ___      _   __      ___
|| / /||/ / //___) ) // //   ) ) //   ) ) // ) )  ) ) //___) )
||/ / |  / //       // //       //   / / // / /  / / //
|  /  | / ((____   // ((____   ((___/ / // / /  / / ((____


 /__  ___/
   / /   ___
  / /  //   ) )
 / /  //   / /
/ /  ((___/ /

             ___   ___               ___   ___
    //    / /   / / /__  ___/           / /    //    ) ) //   ) )
   //___ / /   / /    / /              / /    //    / / //
  / ___   /   / /    / /      ____    / /    //    / / //
 //    / /   / /    / /              / /    //    / / //
//    / / __/ /___ / /            __/ /___ //____/ / ((____/ /test_user1@juniper-vsrx-01>

test_user1@juniper-vsrx-01>
|
升级JunOS
首先下载对应的包放在本地,当然也可以放在设备的文件系统上,这个看需求,示例中放在本地:
将文件放在/opt/junos-ansible/junos-vsrx-x86-64-19.3R2.9.tgz。
然后再次编写一个playbook,名为install-os.yaml
 1
 2
 3
 4
 5
 6
 7
 8
 9
10
11
12
13
14
15
16
17
18
19
20
21
22
23
24
25
26
27
28
29
30
31
32
33
34
35
36
37
38
39
40
41
42
43
44
45
|
---
- name: Install Junos OS ## 剧本名称
  hosts: junos  ## 配置的组
  roles:
    - Juniper.junos  ## 调用的roles
  connection: netconf ## 连接方式
  gather_facts: no

  vars:     ## 变量,不解释了
    OS_version: "19.3R2.9"
    OS_package: "junos-vsrx-x86-64-19.3R2.9.tgz"
    pkg_dir: "/opt/junos-ansible"
    log_dir: "/var/log/ansible"
    netconf_port: 830
    wait_time: 3600

  tasks:  ## 定义多个任务
    - name: Checking NETCONF connectivity ## 任务名称
      wait_for:
        host: "{{ inventory_hostname }}"
        port: "{{ netconf_port }}"
        timeout: 5
    - name: Install Junos OS package  ## 任务名称
      juniper_junos_software: ## 调用的modules
        version: "{{ OS_version }}" ## 传入vars中定义的变量值
        local_package: "{{ pkg_dir }}/{{ OS_package }}" ## 包的路径
        reboot: true ## 是否重启
        validate: true ## 是否验证
        cleanfs: true ## 是否清理文件系统
        logfile: "{{ log_dir }}/software.log" ## 日志位置
      register: sw
      notify:
      - wait_reboot

    - name: Print response
      debug:
        var: response

  handlers:
    - name: wait_reboot
      wait_for:
        host: "{{ inventory_hostname }}"
        port: "{{ netconf_port }}"
        timeout: "{{ wait_time }}"
      when: not sw.check_mode
|
我在playbook中描述了大概的注释,运行的时候,请先把注释删除。
1
|
ansible-playbook install-os.yaml
|
不知道vSRX什么情况,不能升级,但是我在硬件设备都成功了。
现在可以看到,JunOS已经倒计时重启,开机后可以执行show version
创建用户
这里我们将演示如何创建用户:
编写名为user.yaml的playbook:
 1
 2
 3
 4
 5
 6
 7
 8
 9
10
11
12
13
14
15
16
17
18
19
20
21
22
23
24
25
26
|
---
- name: Create User On Junos OS
  hosts: junos
  roles:
    - Juniper.junos
  connection: netconf
  gather_facts: no

  tasks:
    - name: Create list of users
      junos_user:
        aggregate:
          - {name: test_user1, full_name: test_user2, role: operator, state: present}
          - {name: test_user2, full_name: test_user2, role: read-only, state: present}
    - name: set user1 password
      junos_user:
        name: test_user1
        role: super-user
        encrypted_password: "{{ 'my-passwordsdf' | password_hash('sha512') }}"
        state: present
    - name: set user2 password
      junos_user:
        name: test_user2
        role: super-user
        encrypted_password: "{{ 'my-password43' | password_hash('sha512') }}"
        state: present
|
然后执行这个playbook
1
|
ansible-playbook user.yaml
|
这将在名为junos的group中创建这些用户,并设置角色和密码。
playbook运行完成后,可以登陆设备测试。
配置变更
这里再次编写playbook,命名为get-config.yaml:
 1
 2
 3
 4
 5
 6
 7
 8
 9
10
11
12
13
14
15
16
|
---
- name: "Get Junos OS configuration."
  hosts: junos
  roles:
    - Juniper.junos
  connection: netconf
  gather_facts: no

  tasks:
    - name: "Get committed configuration"
      juniper_junos_config:
        retrieve: "committed"
      register: response
    - name: "Print result"
      debug:
        var: response
|
这将获取设备的配置的信息,也可以将其保存为其他格式:
 1
 2
 3
 4
 5
 6
 7
 8
 9
10
11
12
13
14
15
16
17
|
---
- name: "Get Junos OS configuration."
  hosts: junos
  roles:
    - Juniper.junos
  connection: netconf
  gather_facts: no

  tasks:
    - name: "Get configuration in XML format"
      juniper_junos_config:
        retrieve: "committed"
        format: "xml"
      register: response
    - name: "Print result"
      debug:
        var: response
|
也可以保存到文件:
 1
 2
 3
 4
 5
 6
 7
 8
 9
10
11
12
13
14
|
---
- name: "Get Junos OS configuration."
  hosts: junos
  roles:
    - Juniper.junos
  connection: netconf
  gather_facts: no

  tasks:
    - name: "Get selected configuration hierarchies and save to file"
      juniper_junos_config:
        retrieve: "committed"
        filter: "system/services"
        dest_dir: "{{ playbook_dir }}"
|
这将保存过滤后的配置信息到本地,内容如下:
 1
 2
 3
 4
 5
 6
 7
 8
 9
10
11
12
13
14
15
16
17
18
|
system {
    services {
        ssh {
            root-login allow;
            sftp-server;
            hostkey-algorithm {
                ssh-rsa;
                no-ssh-ecdsa;
            }
        }
        netconf {
            ssh;
        }
        web-management {
            http;
        }
    }
}
|
也可以对交换机执行set以及delete类的配置
编写示例文件config-irb.10.yaml:
 1
 2
 3
 4
 5
 6
 7
 8
 9
10
11
12
13
14
15
16
17
18
19
20
21
22
23
24
25
26
|
---
- name: "Get Junos OS configuration."
  hosts: junos
  roles:
    - Juniper.junos
  connection: netconf
  gather_facts: no

  tasks:
  - name: load configure lines into device
    junos_config:
      lines:
        - set interfaces ge-0/0/1 unit 0 description "Test interface"
        - set vlans vlan01 description "Test vlan"
      comment: update config

  - name: Set routed VLAN interface (RVI) IPv4 address
    junos_config:
      lines:
        - set vlans vlan01 vlan-id 1
        - set interfaces irb unit 10 family inet address 10.0.0.1/24
        - set vlans vlan01 l3-interface irb.10

  - name: Check correctness of commit configuration
    junos_config:
      check_commit: yes
|
然后让我们登陆到JunOS上查看配置是否已经生效:
1
|
show |compare rollback 1
|
回显如下:
 1
 2
 3
 4
 5
 6
 7
 8
 9
10
11
|
[edit interfaces]
+   irb {
+       unit 10 {
+           family inet {
+               address 10.0.0.1/24;
+           }
+       }
+   }
[edit vlans vlan01]
+   vlan-id 1;
+   l3-interface irb.10;
|
不多介绍功能了,这些功能主要是名为Juniper.junos的Ansible-Galaxy Role,以及Ansible的junos模块,这些依赖于netconf以及JunOS PyEz,以下是对应的文档地址:
Ansible Junos
Ansible-Galaxy Juniper.junos
Docs for Juniper.junos
具体参数可以查看这几份文档。
Ansible虽然算是比较简单的了,但是对于Jinja2 模板变量的编写还是相对难上手的,但Terraform的变量声明可以算是一股清流。
逛论坛和Google半个月也没找到有关Juniper的Terraform Provider,社区插件都没有,Github上倒是找到了一个,不过不太完美,不敢用在生产,这里只做演示,希望以后官方或社区可以贡献一份生产可用的Terraform Provider。
-
下载二进制文件
1
|
curl -O https://releases.hashicorp.com/terraform/0.12.18/terraform_0.12.18_linux_amd64.zip
|
-
解压到/usr/sbin/
1
|
unzip terraform_0.12.18_linux_amd64.zip -d /usr/sbin/
|
-
测试执行terraform --version
安装Junos Priovider(不建议生产,非官方,非社区插件)
-
下载二进制文件
-
解压到/usr/sbin/
1
2
|
tfPath=$(which terraform | rev | cut -d'/' -f2- | rev)
tar -zxvf terraform-provider-junos*.tar.gz -C ${tfPath}
|
与Ansible相同,需要在运行JunOS的设备上开启ssh以及netconf:
1
2
3
4
|
set system services netconf
set system login user netconf uid 200?
set system login user netconf class xxx
set system login user netconf authentication load-key-file /tmp/id_rsa.pub
|
Terraform会读取当前目录下的所有以.tf结尾的文件。
首先先创建一个目录:
1
2
3
|
mkdir -pv /opt/terraform-junos-example
cd /opt/terraform-junos-example
touch junos-example.tf
|
现在开始声明 junos-example.tf文件:
  1
  2
  3
  4
  5
  6
  7
  8
  9
 10
 11
 12
 13
 14
 15
 16
 17
 18
 19
 20
 21
 22
 23
 24
 25
 26
 27
 28
 29
 30
 31
 32
 33
 34
 35
 36
 37
 38
 39
 40
 41
 42
 43
 44
 45
 46
 47
 48
 49
 50
 51
 52
 53
 54
 55
 56
 57
 58
 59
 60
 61
 62
 63
 64
 65
 66
 67
 68
 69
 70
 71
 72
 73
 74
 75
 76
 77
 78
 79
 80
 81
 82
 83
 84
 85
 86
 87
 88
 89
 90
 91
 92
 93
 94
 95
 96
 97
 98
 99
100
101
102
103
104
105
106
107
108
109
110
111
112
113
114
115
116
117
118
119
120
121
122
123
124
125
126
127
128
129
130
131
132
133
134
135
136
137
138
139
140
141
142
143
144
145
146
147
|
## Configure the Junos Provider
provider "junos" {
  ip         = "192.168.1.105"
  username = "root"
  sshkeyfile = "/root/.ssh/id_rsa"
}

## Add a application
resource junos_application "mysql" {
  name             = "mysql"
  protocol         = "tcp"
  destination_port = "3306"
}

## Add a set of applications
resource junos_application_set "ssh_telnet" {
  name         = "ssh_telnet"
  applications = ["junos-ssh", "junos-telnet"]
}

## Configure interface of switch
resource junos_interface "interface_switch_demo" {
  name         = "ge-0/0/0"
  description  = "interfaceSwitchDemo"
  trunk        = true
  vlan_members = ["100", "101"]
}

## Add a vlan
resource junos_vlan "blue" {
  name        = "blue"
  description = "blue-10"
  vlan_id     = 10
}

## Configure a L3 interface on Junos Router or firewall
resource junos_interface "interface_fw_demo" {
  name         = "ge-0/0/0"
  description  = "interfaceFwDemo"
  vlan_tagging = true
}
resource junos_interface "interface_fw_demo_100" {
  name        = "${junos_interface.interface_fw_demo.name}.100"
  description = "interfaceFwDemo100"
  inet_address {
    address = "192.0.2.1/25"
  }
}

## Add a destination nat pool
resource junos_security_nat_destination_pool "demo_dnat_pool" {
  name    = "ip_internal"
  address = "192.0.2.2/32"
}

## Add a destination nat
resource junos_security_nat_destination "demo_dnat" {
  name = "dnat_from_untrust"
  from {
    type  = "zone"
    value = ["untrust"]
  }
  rule {
    name                = "nat_192_0_2_129"
    destination_address = "192.0.2.129/32"
    then {
      type = "pool"
      pool = "pool_trust"
    }
  }
}


## Add a source nat pool
resource junos_security_nat_source_pool "demo_snat_pool" {
  name    = "ip_external"
  address = ["192.0.2.129/32"]
}
## Add a source nat
resource junos_security_nat_source "demo_snat" {
  name = "nat_from_trust_to_untrust"
  from {
    type  = "zone"
    value = ["trust"]
  }
  to {
    type  = "zone"
    value = ["untrust"]
  }
  rule {
    name = "nat_192_0_2_0_25"
    match {
      source_address = ["192.0.2.0/25"]
    }
    then {
      type = "pool"
      pool = "pool_untrust"
    }
  }
}

## Add a static nat
resource junos_security_nat_static "demo_nat" {
  name = "nat_from_trust"
  from {
    type  = "zone"
    value = ["trust"]
  }
  rule {
    name                = "nat_192_0_2_0_25"
    destination_address = "192.0.2.0/25"
    then {
      type   = "prefix"
      prefix = "192.0.2.128/25"
    }
  }
}

## Add a security policy
resource junos_security_policy "demo_policy" {
  from_zone = "trust"
  to_zone   = "untrust"
  policy {
    name                      = "allow_trust"
    match_source_address      = ["any"]
    match_destination_address = ["any"]
    match_application         = ["any"]
    then                      = "permit"
  }
}

## Add a security zone
resource junos_security_zone "demo_zone" {
  name              = "DemoZone"
  inbound_protocols = ["bgp"]
  address_book {
    name    = "DemoAddress"
    network = "192.0.2.0/25"
  }
}

## Add a static route
resource junos_static_route "demo_static_route" {
  destination      = "192.0.2.0/25"
  routing_instance = "prod-vr"
  next_hop         = ["st0.0"]
}
|
首先初始化
然后构建
这个插件逻辑不太通,所以使用的时候需要浪费很多时间调试。
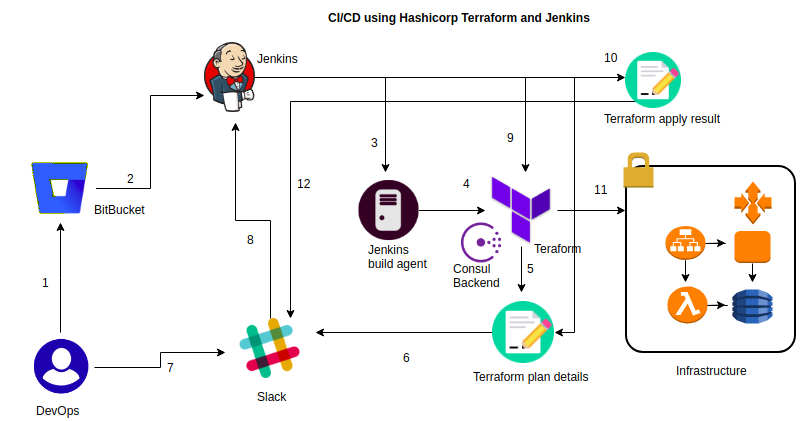
如何实现CI/CD
首先得现有一个CI工具,主流的就是Jenkins,这个还在犹豫,想尝试一下Drone或者Tekton,在Pipeline上调用插件,Ansible或是Terraform,使用git进行版本控制,最后实现业务从申请到上线,不需要人肉传递信息,只需要审批流程+n个动作,不需要或很少需要人工干预实现业务上线,就类似这样:


